
Handwritten elements for digital design and scrapbooking have been very popular for the last few years. There are some designers who have built their business around their handwriting (like Ali Edwards) and some who include their fabulous penmanship as a part of larger digital kits (my favourites are Paislee Press and TaylorMade Designs). Of course, there are also thousands of handwritten fonts to be found on the internet as well.
I love using handwritten elements in my photo books and layouts, but I hate spending money on something I know I can do myself. So with my new iPad in hand, I began trying out free drawing apps. The first one I really liked was Sketches, but it was not easy to share with Photoshop and that was a major drawback for me. Then I stumbled across Paper by FiftyThree and fell in love! This app was so easy to draw and write with, and, most importantly, I could send it straight to Photoshop.
I have been using the Paper app quite a bit for creating my own handwritten elements, so I thought I would give a quick demo on how I use it and share it with Photoshop.
Once the app has downloaded, the first step is to start with a fresh page and practice your handwriting. I didn’t think I had nice handwriting at all, but I practiced (a lot) within the app and eventually I found my own style that flowed out of the “pen” pretty easily. All I used for a stylus was a cheap one I received as a stocking stuffer a few years ago. I would love to get a nicer one, Pencil by FiftyThree, but for now this works just fine.

This looks like my first attempt, but it was probably the twentieth try! Just keep erasing until it looks just right!
To send this to Photoshop, simply follow these three steps: (Note: at some point it may prompt you to sign in with your Adobe ID.)

(Another quick note: I like to save all my projects with the background OFF just in case I want the image to have a transparent background or a colour other than white.)
I already had Photoshop running on the computer, so almost instantly this is what appeared on the screen:
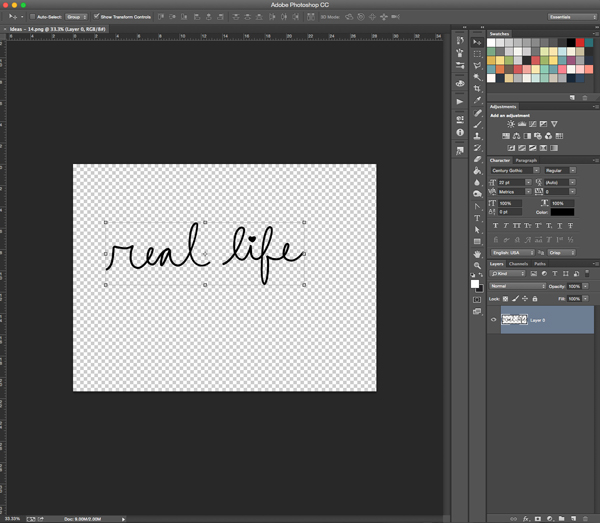
The checkerboard background means there is no background, it is transparent. If I were to trim this (Image>Trim) and save it as a .png, then this phrase would be ready to use for any project. It really is as quick as that!
I was so impressed by the simplicity that I ran upstairs full of excitement to show my husband how awesome it was!!
In last weeks post I shared a layout using this “real life” handwritten element as part of the title:

This quick and easy process inspired me to write a whole page of words to be used in the 2015 family album digital kit. Once again, these words didn’t just come out like this on the first try – there was a lot of undoing and rewriting!!

I am still working on the digital kit and, unfortunately, you will have to wait until next week to find out how I used these handwritten words as part of a it!
Until then, enjoy the beautiful spring weather, unless you happen to live in Alberta, then enjoy “sprinter” (winter in spring)!!
Leah

