
During the winter I love to hide in my basement office with a cozy blanket wrapped around my shoulders and work on photo books, scrapbook layouts (of the digital variety), and write blog posts. During the summer… not so much!! That is why I have been a bit absent from the blog for the last few weeks.
I had a question emailed to me last week on how to create a page template for a photo book, specifically the “Collection of Photos” book. So on this hot summer evening, I am taking advantage of the cool basement office to write a simple tutorial.

Below is a simple tutorial for how I made the template using Photoshop CC.
- Open a new file sized to fit one page of the photo book. I like square books, so I always make the pages 12″ x 12″. (Even if I end up ordering a 10″ x10″ or 8″ x 8″ book, the pages will scale down nicely when uploading to the printer’s website.)

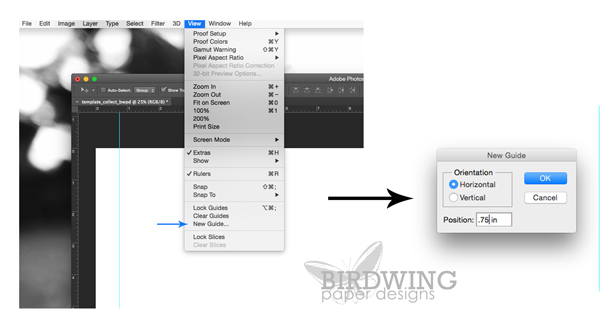
2. Set up guides to represent the bleed area and border for the photo book. Go to View at the top menu then select New Guide from the drop down menu. Enter the position of the guide and repeat for the four sides of the page.
If you are unsure what the bleed areas should be, check the photo book printing company’s website or email them. For most printers, leaving 0.5″ on all sides for a border/bleed area is sufficient. I use Adoramapix for all my books and I like to leave 0.75″ border on three sides with a 0.25″ border on the side that will join the other page. (They print lay flat books so I don’t need to worry about losing pictures in the gutter.)
3. Use the Rectangle Tool (or any other shape) to create a box the size of the photo. For the “Collection of Photos” I scaled the photos down to 2.6″ x 3.4″ (780 px x 1020 px). Also choose a fill colour for the rectangle that is neutral, like a light grey.

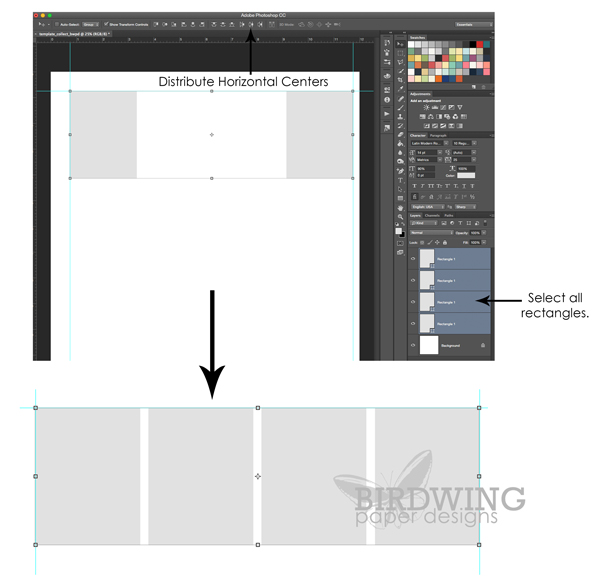
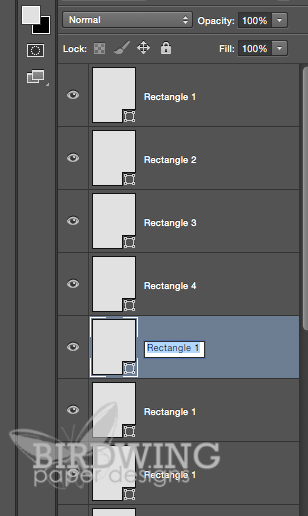
4. We are going to make four rectangles across the page, so line up that first rectangle to the upper left corner where the guides are. Duplicate the rectangle (CMD + J) three times. At this point, it is important to keep track of the order of rectangles in the layers panel. Keep the top rectangle in the upper left corner and move the bottom rectangle to the upper right corner (hold the SHIFT key down so it moves straight over). Then move the other two into their positions at the top of the page just guestimating where they should go.
5. Select all four boxes (click top rectangle in Layers Panel, hold SHIFT, and click bottom one). With the Move Tool selected, there will be an option on the top menu to Distribute Horizontal Centers. Click that to evenly space the rectangles.
6. With the same four rectangles selected, copy (CMD + J), and move them to the bottom of the Layers Panel (CMD + SHIFT + [ ). Move this group of rectangles to the bottom of the page aligning with the guides.
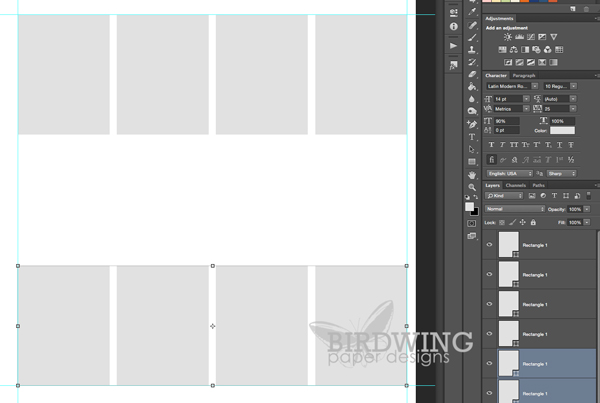
7. Repeat the copying of the group of rectangles already selected and move the next ones to the centre of the page. Now you have a template of 12 rectangles (to clip 12 photos) on one page.
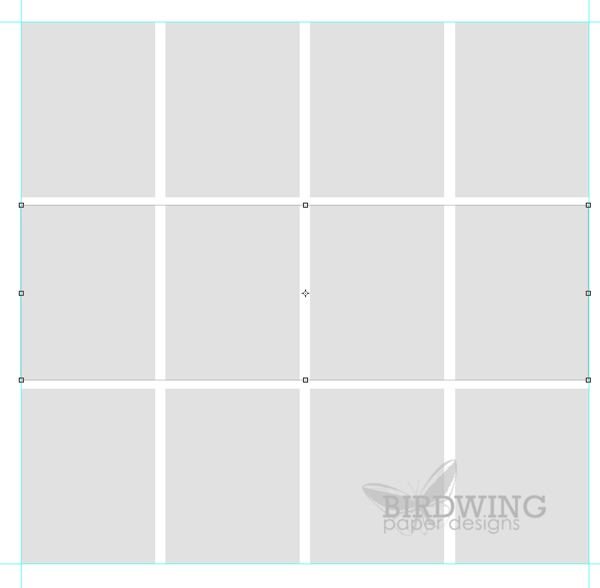
8. I like to have all the photos in order, so double check that the rectangles are in the right order by clicking each layer in the Layers Panel starting at the top.
9. This step is optional – change the name of the rectangles to reflect the order on the page. I find this helps when I am trying to add the photos later.
10. The last step is to save the file as a Photoshop file (.psd) which keeps the layers intact. Go to File on the top menu bar and select Save As. Give the file a name, select folder, and the format (Photoshop). I have a separate folder where I keep all the templates and they are named so I can easily recognize them (example: template_collect_LTpage).

Now you have a template ready to go for all those summer photos!
I will return to the blog in September with a follow up to this tutorial, How To Clip Photos To A Template, as well as a summer update on our 2015 Family Album.
Enjoy the last 3 1/2 weeks of summer!
Leah


This is a great tutorial! You make it look so easy…ha ha…but I know I will have to click back to your tutorial for every step!
LikeLike