
A few weeks ago I posted a card on Instagram (@ellefedynak) for a special Artisan Design Team challenge. The challenge was to make a card featuring the least used Stampin’ Up! colour in your stash! That was an easy choice for me… Cajun Craze ink and paper are sitting on my shelf in brand new condition!! Here is what I came up with:

I had a lot of questions about how I created the background for this card, so I thought I would make a little step-by-step post on how I made it.
Step 1: Ink up the background stamp, Wild Roses, with 4 different colours: Cajun Craze, Calypso Coral, Pale Papaya, and Mint Macaron. I used sponge daubers to blend the ink on the stamp.

Step 2: Press a piece of Basic White cardstock (5.25″ x 4″) on top of the stamp and press firmly with your hands.

Step 3: Use the sponge daubers again to blend the same ink colours on top of the stamped image to add a little colour to the white background. Note/warning – I must not have cleaned my green sponge very well because it turned out more like Shaded Spruce!!


Step 4: Stamp the Daisy Garden background with Versamark and apply to the coloured card stock. Heat emboss with Gold Embossing Powder.
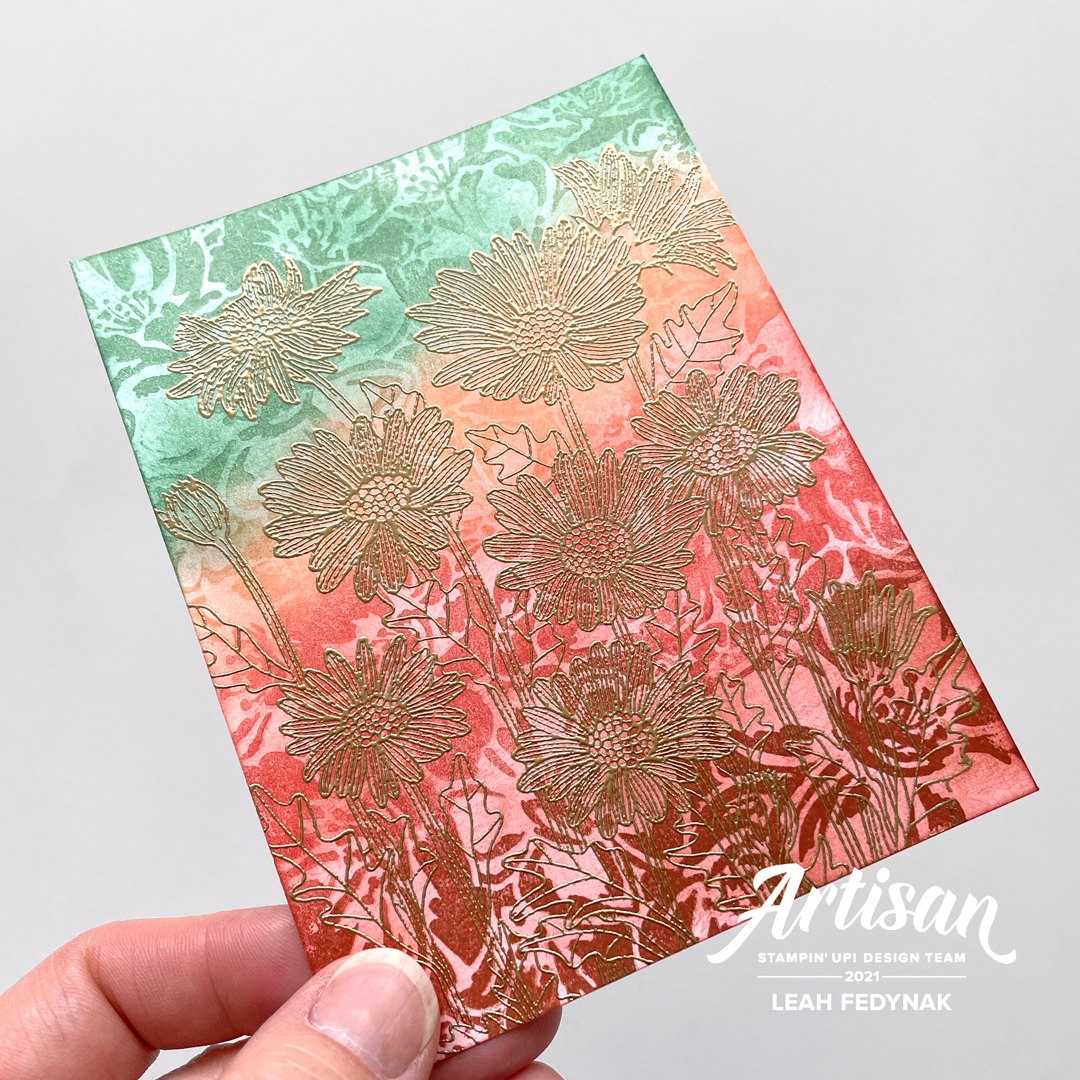
Step 5: Highlight the daisies by colouring them in with the White Chalk Marker. As you colour, wipe the gold emboss with a rag to remove the excess.

Now the background is finished and is ready for a greeting and some embellishments! (This was the original card and the Mint Macaron blended much better! LOL)

I hope you get a chance to play around with the background stamps and different ways of using them!
If you would like to join the “neglected” Stampin’ Up! colours challenge, then make a project with your least favourite colour and be sure to use #loveyourstampinupcolors when you post on Instagram. I can’t wait to see what you make!!
Leah
Stampin’ Up! Supplies Used For This Project
All supplies used in this project can be purchased from my Stampin’ Up! Store.
PAPER: Basic White, Cajun Craze Cardstock
STAMPS: Wild Roses, Daisy Garden, Peaceful Moments
INK: Cajun Craze, Calypso Coral, Pale Papaya, Mint Macaron
PUNCHES & DIE CUTS: Potted Succulents Dies
TOOLS: White Chalk Marker
EMBELLISHMENTS & RIBBON: White Baker’s Twine, Gilded Gems


Absolutely beautiful Leah! Thank-you for the detailed instructions, can’t wait to make these cards💕💕
LikeLike
Magnificent! Thanks for walking us thru the process!
LikeLike
You are welcome!! I made the original card a few weeks before I recreated it for this tutorial and it took me a bit to remember how I did the background!! 😆
LikeLike
Can not wait to try this out – I just purchased the Wild Roses stamp – I thoroughly enjoy reading your posts on your creations – I’ve been a Stampin Up demonstrator for almost 3 years and I’m learning new things each day and love reaching out to other demonstrators and seeing what they have created. Look forward to your next creation
LikeLike
I have also been a demonstrator for almost 3 years, but have been crafting for many years before that!! I love the Wild Roses background stamp and I think it would look great in almost any colour. Sometimes it doesn’t do a full stamp and I actually love it with bits of the image missing too! Thanks so much for checking out my blog and all the creations on it!!
LikeLike
Wish there was an edit button after I posted – lol I went back and reread your instructions – but step 4 and step 5 – I’m a bit confused on these – I’m just starting to learn more about different techniques – just wondering if these two steps would be available on a technique video that I could watch – thanks again
LikeLike
Unfortunately, I don’t have video instructions for it! I wish I did!! Step 4 is basically just adding the gold emboss – stamp the daisies with Versamark on the Wild Roses background, add Gold Embossing Powder, and set with the heat tool. Just make sure to clear off any stray embossing powder before heating it or the image will look messy (one of my pet peeves). I just use a small, dry paint brush to do that. Step 5 is simply colouring in the daisy image with the white chalk marker. The white chalk can stick to the gold emboss, so just wipe it off as you go. It’s a bit time consuming since it’s such a big image, but totally worth it to make the daisies pop from the background! I hope that helps!!
LikeLike
Thank you for the explanation – now I’m not confused – I think I was born confused lol lol – cause, sometimes I find my self reading things more than once to basically understand what its trying to say to me – I’m a visual person so – having no picture or video to follow sometimes messes me up – but your explanation was very easy to follow.. thank you again
LikeLike